Emergency Preparedness: Camping Gear for All Seasons
Here are some recommendations about basic camping gear for all seasons of the year. There is no bad season for camping; only poor equipment choices. (caveat: a wild fire and a tornado are unequivocally bad camping weather; don't do that)
Basic Essentials: Stay Warm/ Stay Dry/ Clean Water/ Clean Food
Step 1: Go camping and see what you like
If you haven't been camping enough to know what style of camping/ cooking/ sleeping/ water treatment you like, do yourself a favor and go camping and find out what you like. If you don't have any gear, borrow some. If you go buy a bunch of gear based on some ill-informed recommendations (like this list) and no knowledge of your own preferences, you may likely regret it. Go now. Then, you can make more informed decisions.
Spring/Summer/Fall
In my opinion, the gear you need for Spring, Summer, or Fall camping is largely the same. It just depends on how specialized you want your gear to be. If you buy generally good gear that is useful over a wider variety of seasons, you can use most of it all the time. We'll talk about winter separately below.
Sleeping Bag (stay warm)
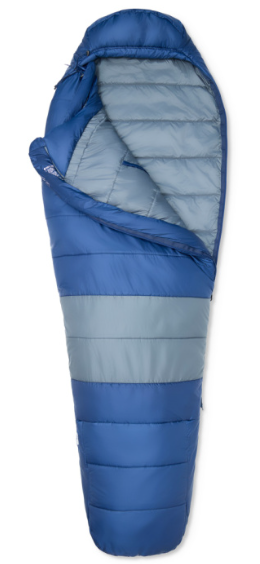
Depends on your preferences and climate. Some people prefer to get a deep freeze back rated to 0F for use in winter, and a lighter bag in the summer. Some people will have 3 or more different bags for different situations. For Spring-Fall weather in NM, I find that if your sleeping bag is rated down to around 20-30F, you can probably use it all three seasons. Mountains near ABQ (Sandias, Jemez, etc) can and do get into the 30 deg F range in Spring and Fall. I've had it snow on me in late May in the Jemez. I have a single bag: down mummy bag, rated to 15F, weighs around 2lb. I use it in all situations throughout the year (see discussion below about winter camping) If you want some lightweight options for different seasons, a bag rated to 40-50F is likely just fine for a summer camping trip (depending on where you are going). I'd recommend getting one rated for at least 10F lower than the temperatures you expect to see.
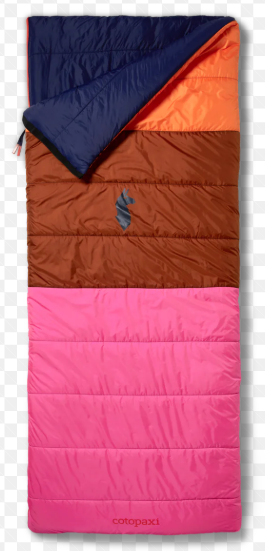
Size/shape: A mummy bag (with a hood on top) fits the contours of your body more snugly and with reduced space in the bag makes it easier to retain warmth. But, some people don’t like the more constricted feel. A rectangular bag is classic, but is heavier (more material) and will take a bit more fill (weight) to stay warm with all other things being equal. Key: try it out. People fit differently and have different preferences. Don’t just buy a bag and assume it will be good for everyone. And, some bags come in different sizes for broader shoulders, taller, etc. While most bags are unisex, they will usually have different temperature ratings for men vs women. Although, there are some mummy bags that are specifically designed for women, which usually have different amounts of insulation in different areas, and have an overall different fit.
Tent/Shelter (stay dry)
You need to stay dry. Whether you just use a bivvy (really just an outer bag/sack to put your sleeping bag in) to a lightweight backpacking tent to a full 20-person family tent that takes 4 people 30 minutes to setup, you’ll want some type of shelter to keep you dry. Or, both of my sons really like to use hammocks. Note: no matter the tent, how ever many people it claims to be good for, usually subtract 1 for a decent fit. A typical 4-person tent will normally only fit 3, even without a lot of gear. A 4-person tent will be pretty roomy for 2 people with a bit of gear. If it says 3, it probably really means 2. (“n-1” for real tent comfort fit)Seasonal Considerations: not much. You can buy a “4-season” tent, which usually means it’s a bit sturdier to not collapse under snow and high wind loads, but normally any regular 3-season tent will be fine throughout the year. (I’ve never owned a “4-season” tent, and I have done lots of winter camping)
.
Features to watch for:
- Weather-proofing considerations - rain fly. A larger family tent usually doesn’t have a full rain fly (one that goes all the way to the ground, or covers the entrances). It’s just hard to find. But, the larger square footage in a large family tent usually means that if a bit of moisture gets in at the entrance, it’s not that big a deal. A 2-6 person tent for car camping or backpacking may have a full rain fly where the rain covering goes all the way to the ground and completely covers all entrances, with a separate zipper opening to get in. These are the most weather-resistant options.
- Vestibule: Tents with a full rainfly usually have some storage space in between the fly and the entrance. If the fly is staked out from the tent with several square feet of area in between the tent and the fly, that area is called a vestibule. It’s great for storing gear outside the tent (roomier in the tent, and cleaner), while still providing some protection from the elements.
- Weight: If you are driving to your campsite, weight doesn’t matter much. But, if you are backpacking 10 miles into the backcountry, you are going to want something lightweight. For reference: I don’t consider 5-6 pounds lightweight. If you split some of the load with someone sharing the tent with you, that’s not bad. If you are going any decent mileage on your own, I’d look to carry something between 2-3 pounds, 4 at the most.
- Ease of Setup: This factor can be important whether you are looking at a small 2-man or a large family tent. See how long it takes you to set it up, whether you will need others to help, or whether you will need extra tools to ease the setup. Another consideration is whether it is self-supporting or if it needs stakes in the ground to properly set it up. Stakes can be hard to secure in really deep sandy soil, or very hard ground. Other options: If wind isn’t too much of an issue, something as simple as staking down a tarp can be effective, and still provide some measure of protection from the rain. For a family gathering, using rope and poles to create a larger lean-to with a large tarp can be a nice respite from the sun.
Water Treatment (Clean Water)
If you are car camping for just a couple days, you can just haul in enough water. If you are backpacking or otherwise trying to get a bit more remote, or don’t know how long you’ll be out, you need to plan on filtering water on your trip. I'm not going to go into an in-depth treatment of various options here, but here are a few possibilities. Get a system, test it; know how to use it.
I used to have a pump, and I liked it (Katadyn Vario), and while it worked great for a few years, as it got older, the filters just seemed to get clogged faster, and I got tired of buying $40 filters for it. I've now got a Sawyer Squeeze, and the similar Katadyn BeFree is also very popular. Both are highly rated for 1-4 people, maybe 5. If you have more people, you probably want a gravity-fed filter made for larger groups of people, like the Katadyn BeFree Gravity 6L (or 10L), or the Platypus GravityWorks 4L. Test them out before your trip. When I go backpacking, I always want a backup water filtration source. Either someone else with a filter, or a little canister of chlorine dioxide tablets or something similar.
Stove (Clean Food)
You can’t always build a fire in the backcountry, and you may not want to. A stove is a good idea to add flexibility to your cooking options. Here is where it is important to understand your preference for cooking style. Do you want pots and pans and the ability to cook with several ingredients to make a wonderful meal? Or, do you just want to boil water for heating up dehydrated food? Or, just a stove with enough of a burner to cook a hot dog or a piece of spam? They all require different stove types. Figure out what you want to do, and buy accordingly.- Isobutane/propane mix is my go-to fuel of choice if I have to carry all my gear myself. It does better at higher altitudes than straight propane. It is also stored at lower pressures than propane, so the canisters don't have to be as heavy.
- For a classic family car camping trip, there's nothing wrong with a large (or medium-sized) two burner stove with a big 20lb propane tank. The smaller 1lb propane tanks are a little heavy for backpacking, but more importantly, they are much more likely to freeze up in cold weather and not operate properly.
- I don't love the white gas stoves as the priming and carrying of liquid fuel doesn't excite me, but it does work better at higher altitudes than isobutane. I won't be covering any gas fuel stoves.
Ultra-lightweight stove, but requires additional pot: There are lots of versions of this, but the MSR Pocket Rocket is a prime example. Weighs next to nothing (the stove itself). Attach it to a isobutane canister, put a pot or frying pan over it, and you are good to go. These tend to be fairly versatile, as the burner is an open configuration allowing you to either use a frying pan or a pot and do what you want with it. They are meant for cooking for 1-2 people at a time.
Also fairly compact and more all-in-one is are the hyper-efficient systems like Jet Boil. (or various generic copykats that are usually still well rated and often sell for $50 or so). They come with a pot and integrated burner assy, sized such that the fuel canister and everything fits inside. Very nice package for backpacking. In my experience, the burner/heat exchanger system is highly optimized for use with their pot and isn't as effective for something like roasting a hot dog over the open flame. But, this style of stove is my go-to for backpacking. I just boil water in it to rehydrate a mountain house meal or something similar. No pot to clean. The food residue stays in the zip-lock mountain house package, which is easy to pack out. Oh, and it is very efficient on fuel, so I could do 4-5 days backpacking, cooking for 2 people, and still get by with a single 100g fuel canister. So, weight saving, too.
Car camping brings the capability of bringing something larger. There are lots of options, and I will only showcase two popular versions. The classic portable Coleman 2-burner stove, and the larger 2 burner camp kitchen variety (and 3-burner version here). Bring a 1-lb or 20lb propane tank, and you have enough capacity to cook for much larger groups.
Food Style (Clean Food)
There are lots of different styles of food for camping. I'll cover a few common varieties:
Full Camp Kitchen: Here's where you bring all the gear, multiple pots, raw ingredients, lots of prep work. Some people really enjoy the cooking aspect in the outdoors. The food can be amazing - it will be whatever you can come up with, usually just as good as cooked at home. Weight, prep time, cooking time, cleanup - all are more involved than other options, but the food can be amazing.
Dehydrated Food: Whether you buy the packaged variety (like Mountain House), or prepare your own - these are very light weight, and the cooking requirements are minimal. Usually you just boil water, mix and let it sit for a few minutes. Eat it right out of the container. Minimum weight, very little clean-up, prep can be almost non-existent (store-bought) to more involved (home-made), and it will never be as tasty as the more involved cooking. But, the home-made stuff can still be pretty good. I just buy the Mountain House meals for the ease and the clean-up. I don't want to have to wash any dishes on a campout. But, those store-bought dehydrated meals are expensive - more than $10 per meal. I plan on posting here some recipes a friend of mine collected for home-made dehydrated/freeze-dried meals. Hopefully soon.
Campfire: This is a lot of fun. Cooking real food over an open fire brings out wonderful flavors. It depends on being somewhere that fires are allowed, having sufficient firewood, and things being dry enough to get it going (or having enough skill to do so regardless). The flexibility on what you can do is pretty high, and the cost is definitely lower than store-bought dehydrated meals. Usually heavier cooking equipment, and sometimes more cleanup.
Clothing (stay warm & dry)
I am not going to dive into a lot of clothing details, but let me focus on socks. Ever hear the phrase "Cotton Kills"? It's because when cotton gets wet, it looses all ability to retain warmth. So, if you are on a cold-weather campout wearing cotton, and you get wet, you will freeze! Even the small amount of moisture from natural perspiration can cause serious problems in cold weather. I wouldn't do any cold-weather camping/hiking with anything but wool socks. In fact, I'd recommend getting good wool socks for any serious backpacking trip. The wool will wick the moisture away from your feet, and will keep you much more dry and comfortable, and less likely to have problems with blisters. Plus, they will generally last longer than cotton. Wool alone won't solve blister problems if you have issues with your boots, etc, but they can help a lot. You can pay $20-$30 for a single pair of good thick wool socks at REI, or Costco often carries a 4-pack of medium-weight wool-blend socks for $15. The Costco socks aren't pure wool, but they work pretty well. Have you ever tried alpaca wool socks?? They are heavenly! (Note: there are popular moisture-wicking synthetics that share many properties with wool, but I still prefer wool)
Backpack
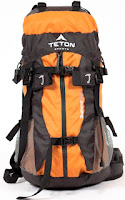
Maybe not an essential - but a decent backpack is often a good way to carry gear and keep it dry, even if you aren’t backpacking, per se. I really enjoy my REI pack, as well as Gregory and Osprey gear. But, they can be expensive. Depending on your needs, the Teton Brand (sold at Sportsman’s Warehouse or even on Amazon) can be pretty affordable. I’ve seen several youth use these for years, and one of my sons has borrowed one several times - they seem pretty decent and well-built. They can also be a quick and easy way to stash a family’s worth of 72-hr kits for grab & go access.
If you are looking to get backpacks for kids for actual backpacking trips, I’d recommend not spending a lot of money on it unless they are old enough to not grow out of it in 1-2 years.
Features to look for:
I personally prefer hydration reservoirs over water bottles, so I look for a pack that has a built-in pouch for a reservoir and a good system to route the hose out to the shoulder straps for sipping while hiking. Almost anything these days will have this, though.
Lots of straps and pockets to attach/hold onto things. I am a fan of more organization and not just throwing everything into one large cavernous spot. But, everyone is different.
I love it when they come with a place to stash a water-proof pack cover, but that’s just a convenience. Most packs will be relatively water-resistant even without a pack cover in all but the most intense storms.


