Monday, July 18, 2022

Four Pass Loop (Maroon Bells - Snowmass Wilderness, near Aspen, CO)

Latitude, Longitude: 39.0986257, -106.9406552 Elevation: ~9585ft (at trailhead)

Elevation varies from 9585' at trailhead to ~12,500' at each pass.


Weather Forecast:  Maroon Bells Weather Forecast (4315m) (mountain-forecast.com)

Fire Restrictions: White River National Forest - Home (usda.gov)


Intro

I debated and debated over whether to post this.  Afterall, this blog is supposed to be about camping in New Mexico.  Aspen, Colorado is decidedly not New Mexico. I'm still not sure I won't publish this and then immediately take it down.  However, taking a group of young men on a 4-day backpacking trip requires a lot of advanced planning, and at the time we were planning this trip for early July 2022, all major wilderness areas in New Mexico were closed due to fire danger and approximately half the state seemed to actively be on fire.  2022 has been a rough year for our beautiful forests.

When looking for options outside New Mexico for a trip this summer, we came across abundant information resources about this amazing trail that was breathtakingly beautiful and a solid bucket list item, along with being a decent challenge for experienced backpackers.  We had to go for it.  With all those resources, however, there likely isn't a need for one more blog post about one of the most well-trafficked trails in Colorado.  Perhaps this is a cathartic exercise in recounting all the things I should have done better, or just a good opportunity to post some pictures of an amazing place.

The Four Pass Loop is a 27-mile trek through four different mountain passes, each around 12,500'.  From the Maroon Lake Trailhead (9585ft), you will climb up to a 12,500ft mountain pass, and then typically most of the campsites are around 11,500ft.  Phrases such as "breathtaking", "iconic backpacking experience", "must be on your bucket list" are common in reviews of this amazing trek.

Resources

Do your homework; be prepared.  First, watch this stunning video by Steven Smith, who filmed his hike on the trail.  It has a good smattering of the beauty and the weather you are likely to encounter, and is oddly satisfying to watch.  28 Miles Alone on the Four Pass Loop - ASMR - Inspired by Kraig Adams - YouTube.  

USFS Official Resource on the trail; very helpful.  Four Pass Loop - West Maroon to Buckskin (usda.gov)


Several other informative posts:


Preparation

Yes, you really *do* need reservations to either park at the trailhead or take the shuttle.  The trailhead is a popular destination.  We opted for the shuttle because, a) I think the parking lot reservations for the days we had in mind were already full, and b) I *believe* the road is closed to only allow shuttle bus traffic during most of the day, and we didn't want to restrict what time we could get out.  See here for more info on reservations.  The shuttle leaves from Aspen Highlands Ski Resort (out front, by the parking garage).  Parking there is pretty pricey for a multi-day trip, as the 2022 cost was $40/day.  I was told there is a place in Aspen where the parking is only $6/day, but it wasn't open then.  I think you'd be required to take a free city bus from that location to Aspen Highlands to get to the shuttle.

Yes, you really *do* need to use an approved bear canister.  I didn't have one and I've never needed one for camping in New Mexico, so I wasn't thrilled with the idea of buying one.  I toyed with the idea of getting a Ursack, which was supposedly approved for use in this area and seemed more usable in future outings than a rigid canister.  However, the Ranger told us (and corroborated by other info I saw online) the Ursacks, while technically allowed, weren't recommended, weren't found to be super effective, and likely would be ravaged by rodents which may then lead to larger issues with bears.  So, when a friend offered to let me borrow a canister of his, we went that direction.


Let me tell you, stuffing all your food for a 4-day backpacking trip into a rigid canister isn't easy.  We barely managed to get food for 2 of us into a 6.9L canister.  A member of our group packing food for 1 person into a 4.5L canister had much better luck.  However, make sure you plan appropriately so all your trash will also fit in the canister.  Pack it in, pack it out.  Seems straightforward, but some in our group didn't plan as well as they should have.  ("Mountain House"-type dehydrated meals only fit with multiple days of other food if you empty the contents into a ziplock; they come prepackaged with a bunch of air.  I like the ease-of-use of their zip-top packaging, though, so I flattened them and stuffed them down along the walls of the canister.)

Bug spray.  You will need insect repellant.  The.mosquitos.were.winning.

As of 2022, you don't have to have a limited-access permit to hike here, but you do have to fill out a permit upon arrival and indicate which campsite you intend to stay at each day.

The Trek

As is common, we started out going clockwise around the loop.  Most people recommend this option, as it begins with a more gradual (but long) climb to the first pass, and some claim that it saves the best scenery (Buckskin Pass) for last.  I was all for starting out a bit more gradually.  As for "best scenery"; I don't know - it was all pretty amazing.  Hard to identify a specific pass or location that was hands down better than others.  So, the route we took had us doing approximately 6.5 miles the first day from Maroon Lake to a campsite just past West Maroon Pass, around site number 36 or 37.  Doing 3000' elevation in one day, combined with having the climb to the 12,500' pass at the end of the day made it feel like it was the hardest day.  Maybe some adjustment to the altitude that first day was part of the difficulty.

Day 2, we hit Frigid Air Pass within the first mile or two from our campsite, climbed down to around 10,500' elevation, and then climbed back up to around 12,000' before we lowered again to a campsite around 11,500'-11,700' (21 or 22).  That was definitely the most distance at around 8.5 miles.  We were pretty tired, but not as wiped out as from the first day.

Day 3 was pretty easy, relatively speaking.  Again, we hit our pass early in the day, within just 1.5 miles or so of our campsite crossing Trail Rider Pass.  We did go lower before climbing again partway toward Buckskin pass to stay at Campsite 6.  However, the overall distance was only around 5.5 miles, so it was much more relaxing.  Plus, the campsite was gorgeous.  It was a nice little flat area buried in the pines with a stream on either side of the campsite.  Boy, filtered water from those streams was *so* tasty!  Oh, but this one was the worst for mosquitos.  They were usually worst in the late afternoon/early evening.  They didn't usually bother us much in the mornings.  I was told that if you take the side hike down to Snowmass Lake (we passed it this day, but the main trail never actually goes down to the lake), the mosquitos are pretty horrendous.  

Day 4!  Last day!  We hit Buckskin Pass early in the day, and then pretty much downhill all the rest of the way out.  Honestly, for the first part of the way down from the pass, I didn't think it was all that steep and I wondered why people tried to avoid it.  However, as we got further from the pass, it really got steeper and pretty rocky on the way down.  Our mileage for the last day was only slightly longer than day 3 around 5.9 miles.

Elevation profile as we went CW around the loop (note, this was the pre-planned trek, not the actual track log; we had battery issues with the GPS preventing an all-inclusive track log):

Our pre-planned trek, including coordinates for some of the campsites we were planning on hitting, can be downloaded here.

Drinking Water

There is water all over the place here, but you can some days go several miles without seeing any water worthy of filtering.  Not knowing ahead of time whether our destination campsites would have easy access to water, I ended up filling up my 3L reservoir at least once per day.  I ended up not needing to carry that much water and could have generally done with just 2L.  As it turns out, each of our campsites had decent access to water.  The Wed night site just past West Maroon Pass was only ~75yards from a good stream.  We passed an awesome filtering opportunity just before the last ridge on the way to the Thursday night campsite prior to Trail Riders Pass, but ended up with two ponds within 100-200 yards of our campsite.  The closest one wasn't great for filtering, but we hit the second pond on the hike out the next day.  As mentioned above, the Friday night site (site 6, I think) had super close streams on either side of the campsite.

I really do prefer drinking from a hydration reservoir, but they admittedly take more work to refill (require taking off the pack and partially unpacking to get them out).  If you were inclined to just drink from a Nalgene and had easy access to your filter, perhaps you'd just carry 1-2 quarts at any one time and fill up anytime you saw water.

Water Crossings

We had been warned that there would be multiple water crossings throughout the hike.  We ended up only having three that required stopping and pulling off our boots.  Two the first day on the way to West Maroon Pass, then a third on the second day on the way toward Trail Rider Pass.  There are numerous other times you have to step through shallow sections of stream, but usually with rocks or other methods to avoid soaking your boots.  I did see some people just tromp on through, with water up to their calves or knees, and they just didn't care.  That's not me.

A river crossing in Fravert Basin on the way to Trail Rider Pass

There was another required crossing on Friday.  It's the only river crossing called out on the AspenTrailfinder.com map linked above between Snowmass Lake and Buckskin Pass.  However, we had been warned that if we headed off to the right (as you hike East) there was a path that led around 100' to some logs that enabled a dry crossing of the river, and then let you loop back to the main trail.

Weather

We really lucked out on the weather.  The mountain weather link above turned out to be somewhat decent for predicting the weather.  I've found that attempts to predict weather in the mountains are fraught with inaccuracy.  In this case, the prediction said we'd get a solid inch of rain and thunder and lightning all Wednesday afternoon, but then not have any rain Thursday, Friday, or Saturday.  It also predicted our daily lows would be somewhere in the upper 40s to lower 50s.  What we got, thankfully, was no rain or thunder all Wednesday afternoon until minutes after we crested West Maroon Pass and were almost to our campsite.  Then, it never rained or thundered again the entire time we were there.  The temperatures were a fair bit lower.  One morning was around 32F, while the other mornings were in the lower 40s.  The daily highs were probably in the 60s, although I'd estimate that on Saturday it might have been in the 70s - it was pretty hot on the way out in the direct sun. 

Photos

Maroon Lake; first day out

Hiking Wed afternoon toward West Maroon Pass

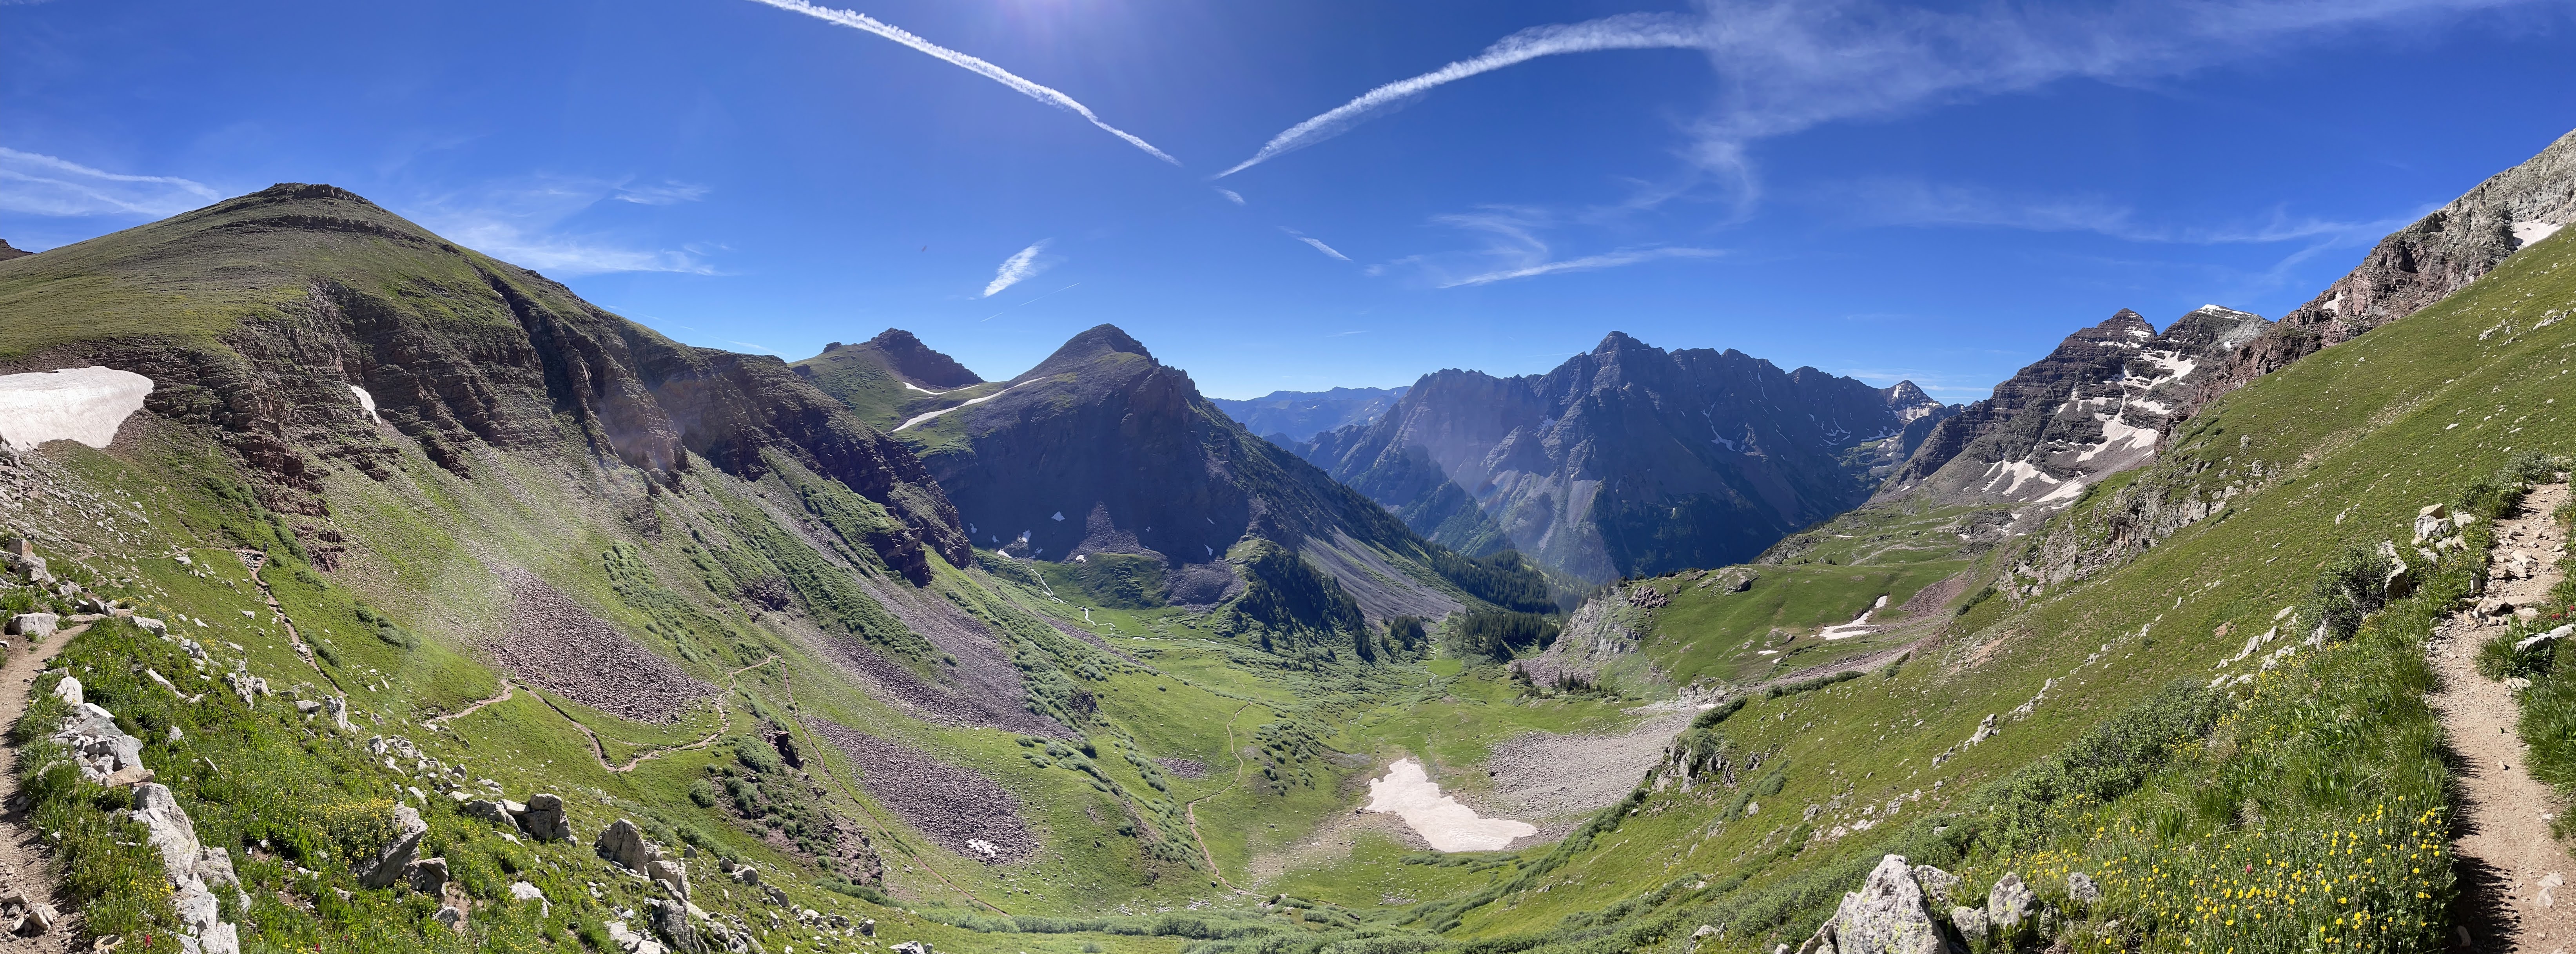
View from West Maroon Pass

more West Maroon Pass

View on the way towards Frigid Air Pass

View from Frigid Air Pass

A beautiful river in Fravert Basin


Hike toward Trail Rider Pass

From campsite the night before Trail Rider Pass


View from Trail Rider Pass

Snowmass Lake, Friday

A view leading up to Buckskin Pass

View from Buckskin Pass

Sunday, July 25, 2021

Stewart Lake and Lake Katherine (Pecos Wilderness)

Latitude, Longitude: 35.81607664, -105.6794137; Elevation: ~8470ft (at trailhead)

Latitude, Longitude: 35.8313105, -105.724921; Elevation: ~10,200ft (Stewart Lake)

Weather Forecast:  https://tinyurl.com/StewartLakeWeather

Fire Restrictions: https://nmfireinfo.com/fire-restrictions/

This was the 2nd time I've been to Stewart Lake (July 2021), with the first time being July 2015.  It was just as beautiful.  It is a gorgeous hike, and a great destination.

We took three days, with a base camp at Stewart Lake that allowed us to day hike up to Lake Katherine.  However, this could definitely be done in a single overnighter.


Keep in mind, we started at the Windsor Creek Trailhead and took 254 until it met up with 261, and then used 261 as a shortcut to meet up with the tail end of 254 to finish up the trip to Stewart.  That's a little under 4 miles, but 261 is a closed trail.  There is a sign indicating it is no longer maintained.  However, the sign doesn't indicate the trail shouldn't be used.  In fact, I emailed the Pecos Ranger District (they aren't much for answering the phone this year) with a few different questions at times.  I got three different responses from what seemed to be different people about whether or not we could take the 261 trail.  The first said it was not an issue; just to be aware it isn't maintained.  The 2nd response said we could choose to take it at our own risk, but we might want to take other options, and they helpfully included information about other available trails.  Only the third said we really ought to pursue other options, and then included the same list of alternative trails.  We went with the average and decided it was fine!  :-)  The closest alternative trail is something like 6-6.5 miles one way.  However, at ~2000ft elevation gain in under 4 miles, our route was a bit steep.  So, it's possible taking 254 the whole route, or one of the other alternatives, may not take any more time as the going should be a bit easier.

That said, although the 261 trail is supposedly no longer maintained, and there were several downed logs, it was actually about the best condition trail we were on this entire trip.  The others weren't bad - but they weren't any better than 261.

Grand Central Station in the Wilderness
Something else to keep in mind is that if you head into Stewart on a Friday in the summer, there may very well be quite a few people there.  It is considered high traffic for a wilderness area.  We showed up on a Thursday early afternoon and there was a large group of 15-20 people camping there.  There are plenty of decent spots, although I'll admit that finding one that is at least 200 ft away from the water and still within decent proximity of a water source for filtering is a bit of a challenge.  Lots of choices if you stay at least 100 ft from the water line, but the signs around the lake ask you to stay 200ft away.

When we got back from our day hike on Friday afternoon, there were another 2-3 groups of people there.  So, if you are looking for quiet seclusion, you may want to go in the middle of the week or look elsewhere.  It was never obnoxious, and people weren't camping all over each other, but you knew there were others around.  I'd say it's worth the visit; it's a beautiful destination - just know what you are getting into.

The map below (as well as the GPS coordinates at the top of the page) show the location of the lake.

A great base for day hiking to other spots

I'll admit I thought the 4 mile trip had quite a bit of elevation to it, but I don't go hiking as often as I used to.  It wasn't so bad that I was hurting the next day, but I didn't feel like I had enough energy to go around and do more hiking the afternoon we arrived at Stewart.  However, there are plenty of nearby destinations.  

There is Spirit lake nearby.  I haven't been there, but the trail map makes it look fairly straightforward.

Lake Katherine is a pristine alpine lake (~12,000ft) approximately 3.5-4.0 miles from Stewart.  It's another nearly 2000ft elevation gain, and so I would not consider it an easy hike.  However, the scenery is spectacular.  If you are really feeling high energy, you can continue on from Katherine to crest Santa Fe Baldy.  I believe it's only another 600ft or so in elevation, but after hiking to Katherine I felt every foot of that elevation gain.  But, what amazing views!


Photos

At our campsite at Stewart Lake, there was a chipmunk or two that were very brazen.  There was also a deer who was willing to wander right through camp and didn't seem bothered by us at all.                                 


There is a picture perfect little stream that feeds Stewart Lake and we used this to filter water.  It was so peaceful and perfect.  I loved sitting there and listening to the water!


Pictures of Stewart Lake:


Pictures of Lake Katherine:


Tuesday, May 18, 2021

Dispersed Car Camping in Jemez past Gilman Tunnels

Latitude, Longitude: 35.8360990, -106.7860470; Elevation: ~7400ft

Weather Forecast:  https://tinyurl.com/AHjemezSpotWeather

Fire Restrictions: https://nmfireinfo.com/fire-restrictions/

So, we never went here as a Boy Scout troop, but for nearly every May for the past... 7 years (?), we've gone here for a church group campout, Fathers and Sons.  It's a beautiful little spot right off a road, nice grassy area for tenting, and near a stream for playing.  Good times. 

It's just dispersed camping on National Forest land in the Jemez Ranger District of the Santa Fe National Forest.


We've always loved this spot.  Seemed perfect for going on a campout with a bunch of younger boys and some other siblings, and just hanging out and having a good time.  

Note that in May, the weather in the Jemez can be highly variable.  In 2021, it was beautiful weather, in the high 60s during the day and the evening weather before bed wasn't below the 40s.  It did get down to 35F overnight, but nothing that required double-bagging.  However, in the same May timeframe, we've had it rain non-stop the entire campout; and at other times, we've seen it snow.  So, watch the weather and plan accordingly.

The map below (as well as the GPS coordinates at the top of the page) show the location we camped at.


A few pictures of the campsite area:


The campground area includes a nice long strip of parking along the road, and a decent size meadow area for playing games, or just hosting lots of tents.  We've easily fit 60+ people here, and had room for more.  The Cebolla River (stream) runs right along the campsite, which dumps into the Guadalupe a mile or so downstream.

Nearby spot for exploration:

You pass through the Gilman tunnels on the way up here (assuming you go that way).  Once you pass the second (north) tunnel, there is a spot to pull off and park.  There are areas you can scramble over the rocks and get down to the water.  I wouldn't send a 2-yr old unaccompanied, but it's not too dangerous.  Highly recommended to stop and enjoy the rushing sound of water in the cascades as they tumble down the canyon.  This Guadalupe River is fed by the Cebolla (runs by the campsite) and the Rio delas Vacas.


Sunday, April 18, 2021

Dipping Vat Campground (Gila National Forest)

Latitude, Longitude: 33.42319, -108.50130; Elevation: 7451 ft

Weather Forecast:  https://tinyurl.com/DippingVatWeather

Fire Restrictions: https://nmfireinfo.com/fire-restrictions/

So, I didn't take the scouts here.  I haven't formally been a scoutmaster for several years now.  But, my family was looking to go to the Gila Catwalks and we decided we wanted to go camping instead of staying at some hotel near Glenwood.  When I saw a description about Dipping Vat as one of the most remote campsites in the Gila National Forest, I was hooked!  (I really don't like having lots of people around when I camp)


Our campsite at Dipping Vat.  Lots of space between adjacent sites.
A few other assorted photos below.


A view of Snow Lake from our campground.

A morning view of our campsite.


A view of Snow Lake from atop the dam on the South Side.  (I've heard there are no natural lakes in all of New Mexico, but all are reservoirs formed by a manmade dam.  I haven't personally verified that, but every body of water I've been to, perhaps with Blue Hole as the exception, did have at least some small dam on one end.  Even Horseshoe Lake.) 

Weather and Desirability:

So, this shouldn't surprise you, but a campground at 7500' can get cold.  The Ranger at Reserve mentioned that they were getting into the 30's at night in town, and that with the lake another 2000' higher or so, I should be prepared for it to get into the 20's.  Hmm, a little chilly for a family campout.  We came prepared with double-bags and lots of other gear to stay warm.  We did fine.  I'm proud of my family for doing so well.  The Ranger wasn't entirely right.  Using two independent thermometers that I have some measure of trust in, it seems it got down to 16F overnight.  That's a bit chilly.

Other factors: This is, in spite of the long distances to get here and the strange route I took (see below), a drive-in campground that I imagine many who pull trailers might use.  There is nice spacing between the campsites, vault toilets, and potable water (although it was turned off for the winter while we were there in April 2021).  I'd like to imagine that such a remote location doesn't get a ton of visitors, even in the summer, but I just don't know.  There were quite a few sites, and they take good care of the place.  I'm inclined to think it wouldn't be so well established with so many sites if they weren't used.  And, for those that care, they do stock the lake for fishing.

I certainly wouldn't mind going here again.  It would be great to bring a kayak or something else to play in the water with.

Also of interest: The Continental Divide trail runs right through this campground, right by the lake.  That's kind of cool.  The night we were there, someone was backpacking through as part of an 8-day trek along the trail.  Another couple liked to have extra food and snacks on hand to share with the backpackers.  What a cool idea!  I'm not sure how I hadn't heard of this with my years of camping and backpacking, but I guess I haven't spent a lot of time around the Continental Divide trail or any other epic trek routes.

Side trip:  

So, the real purpose here was to go to the Catwalks.  I had never been.  This post is really about the Dipping Vat Campground, but the Catwalks are great, and if you haven't gone, you should.  They are about 4-5 hours from Albuquerque, depending on how you get there, so most wouldn't consider it a day trip.  Here are a few nice pictures to whet your appetite.  Go research the rest on your own.


Getting to Dipping Vat:

Fun story.  In researching the trip, I had read about how part of the road to Dipping Vat was kind of rough, and would benefit from a high clearance vehicle.  Nothing technical, like a Moab trail, but would not be friendly to a minivan.  Okay.  We'd be going in with a 4WD Suburban, so I wasn't worried.  Turns out that section of the road from Dipping Vat to the Gila Catwalks was still closed for the winter.  The road from Datil or Reserve was supposed to be much better.  I even called the Reserve Ranger Station to confirm the remaining roads were open and passable.  The ranger was very helpful and indicated I should be careful, as Google Maps could lead people down undesirable paths.  We did a quick check of what it was telling me, and decided I had the right directions.  I should have asked more questions.  It was all good, except for one small detour at the very end.  It led to a lot of adventure that ultimately turned out fine, but it was a bit precarious.  In the image below, you should see a section of map where we traversed down highway 28 doing just fine.  


It's a good, clean, well-maintained gravel road (I'm told it had just been graded a week or two before we went).  Suddenly, google told us to take a hard left at "Loco Mountain Road".  That should have been a warning!  It immediately went from a well-maintained road to what I would describe as a more traditional back-country forest road, with ruts and whatever.  It wasn't immediately very bad, but we had to slow way down.  I remember thinking that even in the Suburban, parts of this might have been tricky after a good rain - very muddy and hard to navigate.  Well, it got worse.  It was exciting.  It was narrow.  There was navigation over large rocks, steep declines, sharp turns.  There was one point where only the combination of high clearance and 4WD got us through.  But, we eventually made it to the lake.  Woot!  What memories!  Well, once we got there, I was discussing the route with another couple at the lake, and they knew exactly what I was talking about.  They said, "No - that's an old ATV trail.  Just go straight out of here, take the one turn toward Reserve, and then stay on that good road. It's pretty decent all the way back to the 'main road' ", which I'm pretty sure was 141.  Sure enough, it was just fine on the way out.  In fact, it wasn't obvious where we had made the wrong turn as directed by Google, but my son later identified it.  If you stay on 28, on a decent gravel road, not taking any sharp turns off to some other road, it will lead you straight to the camp site with no trouble.  So, we took the Suburban where it had no right to go, but it did just fine!  :-)  We definitely took the road less traveled.  Actually, regardless of that detour through Loco Mountain Road, this trip was the most either of us had ever driven on dirt roads for a continuous stretch.  Hours of dirt roads... not just the last 10 miles.  Good times!

Fun point of interest: https://goo.gl/maps/K9hFyBZ7iGCoBab78  

We found a lonely little shelter with an old abandoned pay phone in it!  Out in the middle of nowhere.  Maybe a good hour or more from a paved road.  Not connected anymore.  Just there.  Take a picture!


The map below (as well as the GPS coordinates at the top of the page) show the location we camped at.


Sunday, June 19, 2016

El Malpais National Conservation Area

Latitude, Longitude: 34.735, -107.930 Elevation: ~7100 ft
Weather Forecast:  http://tinyurl.com/malpaisNCA
Fire Restrictions: http://firerestrictions.us/nm/nm-blm/rio-puerco-field-office/

One of our leaders recommended we go down to El Malpais for a campout in November 2015.  We'd been in the Malpais before, but we had usually gone down highway 53 to the Ramah, NM area, or the Lava Tubes.  This time, we went down highway 117 and hit some highlights of the Malpais National Conservation Area.  It was a great trip.

BLM Page for El Malpais National Conservation Area

Map of El Malpais National Monument and El Malpais National Conservation Area
Being November, it was dark before we got down there, as it is a good 2 hour drive from Albuquerque.  We hadn't identified an exact camping spot, but went to look for something decent.  There is an established campsite on the east side of 117 just a bit south of the BLM Malpai Ranger Station.  There is no fee, and there is a vault toilet.  We checked it out, but the site we saw didn't have a ton of flat space, and it had a *lot* of cactus.  Not a good pick for tent camping; at least as much as we could tell in the dark.  So, we kept driving further south until we got past the Natural Arch and Narrows Picnic area, down into a BLM area open to dispersed camping.  The general area was flat, with lots of open area in soft dirt to put down tents just off the road.  There were periodic Mountain Juniper, and a few scragly Pines - with interesting rocky cliffs a quarter mile away.  It was a fine campsite.

Climbing the cliffs near the campsite
The next morning, we waited for it to warm up a bit (it was near 20F that morning!), then some of the adults went exploring the cliffs while the boys cleaned up their area.  Once we were packed up, we headed out to explore other areas.

We drove to La Ventana Natural Arch.  I loved the hues of tan, red, and white cliffs, topped with green Juniper, contrasting against the deep blue New Mexico sky.  It was wonderful.  It was only a short hike, and while they don't let you go all the way up to the Arch anymore, it was still a good stop.
La Ventana Natural Arch

Then, we really had a heyday at the Sandstone Bluffs.  It overlooks the lava field, so you can see for quite a ways, and the boys (and adults!) really enjoyed bouldering and just general scampering around the cliffs and exploring the rock formations.  It was a beautiful place.  All in all, a very successful campout.  I think we'll go here again.  I'll label this with "winter camping", because sometimes you want something in the November-February timeframe that is good for camping, but won't be a snow campout.  I think this fits the bill for that type of winter camping.  In general, I think Spring or Fall would be a good time to visit; I think it will likely be fairly hot in the summer.


The map below (as well as the GPS coordinates at the top of the page) show the location we camped at.